How to Make Khandvi: A Step-by-Step Guide to Perfecting this Gujarati Delight
Khandvi, a savory snack from Gujarat, is a delicious treat made from gram flour (besan) and yogurt. This delicate, rolled snack is not only visually appealing but also tantalizes your taste buds with its unique flavor and soft texture. Follow along with this interactive guide to make perfect Khandvi at home!
Ingredients
For the Khandvi Batter:
- 1 cup gram flour (besan)
- 1 cup plain yogurt
- 2 cups water
- 1/4 teaspoon turmeric powder
- 1/4 teaspoon asafoetida (hing)
- Salt to taste
For the Tempering:
- 2 tablespoons oil
- 1 teaspoon mustard seeds
- 1 teaspoon sesame seeds
- 2 green chilies, finely chopped
- A pinch of asafoetida (hing)
- A handful of fresh grated coconut (optional)
- A handful of fresh coriander leaves, finely chopped
Equipment
- Non-stick pan or heavy-bottomed pan
- Whisk
- Spatula
- Flat surface or tray for spreading the batter
- Knife or pizza cutter
Step-by-Step Recipe
Step 1: Prepare the Batter
Interactive Tip: Play some of your favorite Gujarati music to set the mood while cooking!
- In a large mixing bowl, combine the gram flour, yogurt, water, turmeric powder, asafoetida, and salt. Whisk the mixture thoroughly to ensure there are no lumps. The batter should be smooth and of a flowing consistency.
- Pour the batter into a non-stick or heavy-bottomed pan. Stir continuously on medium heat to avoid lumps.
Interactive Tip: Use a non-stick pan to make stirring easier and to prevent the batter from sticking to the bottom.
- Cook the batter for about 10-15 minutes, stirring constantly, until it thickens. The batter is ready when it starts to leave the sides of the pan and has a smooth, thick consistency.
Interactive Test: Take a small spoonful of the cooked batter and spread it on a flat surface. If it rolls up easily after cooling a bit, your batter is ready.
Step 2: Spread the Batter
- Quickly spread the hot batter onto the back of a flat tray or a clean countertop using a spatula. Spread it as thinly and evenly as possible before it cools and sets.
Interactive Tip: Work quickly during this step as the batter sets rapidly. Enlist a family member or friend to help with spreading if you like.
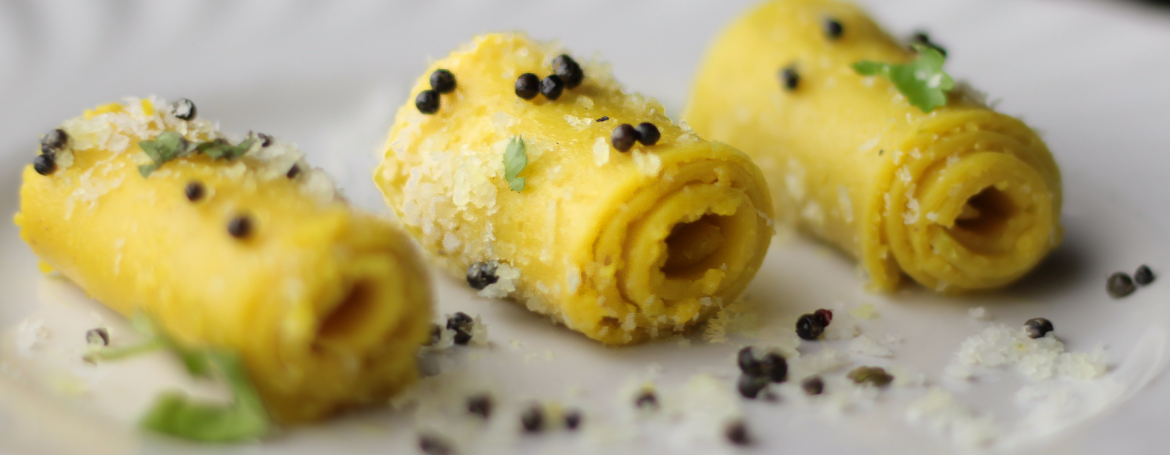
Step 3: Roll the Khandvi
- Once the batter is spread and has cooled for a couple of minutes, use a knife or pizza cutter to cut it into long strips.
Interactive Tip: For perfectly sized Khandvi, aim for strips that are about 2 inches wide.
- Gently roll each strip into a tight spiral and place them on a serving plate.
Step 4: Prepare the Tempering
- Heat oil in a small pan. Add mustard seeds and let them splutter.
- Add sesame seeds, chopped green chilies, and a pinch of asafoetida. Sauté for a few seconds until the chilies are slightly crisp.
- Pour this tempering evenly over the rolled Khandvi.
Step 5: Garnish and Serve
- Sprinkle fresh grated coconut and chopped coriander leaves over the Khandvi for a beautiful garnish.
Interactive Tip: Invite your family or guests to join you in the kitchen for the final garnishing touch. It’s a great way to share the joy of cooking!
- Serve immediately and enjoy this delightful Gujarati snack with a hot cup of tea or as part of a festive spread.
Interactive Tip: Share a photo of your homemade Khandvi on social media and tag us to show off your culinary skills!
Helping Hands:
- Batter Consistency: If the batter is too thick to spread, add a little water and cook it a bit longer. If it’s too thin, cook it longer until it thickens.
- Spreading Issues: If the batter cools too quickly while spreading, you can reheat it gently to make it more pliable.
- Rolling Troubles: If the strips break while rolling, it might be that the batter was not cooked enough. Make sure it leaves the sides of the pan before spreading.
Relish your Khandvi!
Making Khandvi might seem challenging at first, but with a little practice and patience, you’ll be able to perfect this delicious snack. The combination of creamy, spicy, and tangy flavors is sure to impress anyone who tries it. So, roll up your sleeves, follow these steps, and enjoy the delightful process of making and sharing Khandvi!
Interactive Tip: Don’t forget to leave a comment below with your experience and any tips or variations you tried. Happy cooking!